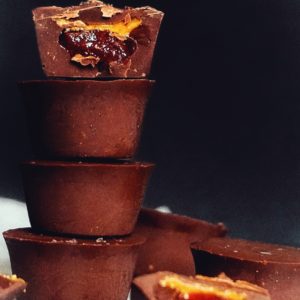
Dairy-Free PB + J Cups
A homemade vegan version of classic chocolate peanut butter cups with a touch of sweet and tangy raspberry jam.
Ingredients
- 2 16oz bags Enjoy Life Semi Sweet Chocolate Chips or vegan chocolate of choice
- 2 tbsp refined coconut oil softened
- 6 tsp peanut butter salted
- 3-4 tsp raspberry jam seedless
Optional (but highly recommended) Topping
- flakey sea salt I use Maldons
Instructions
Melt the Chocolate
- Combine the chocolate chips and coconut oil in a microwave safe dish and heat for 10-15 seconds. Stir and repeat one more time, then stir vigorously until smooth. You may want to heat once more if necessary but the trick is to stir the chocolate until it’s smooth instead of expecting it to be completely melted in the microwave (this will cause the chocolate to overheat)Tip: It's better to do this in increments and stir until smooth, rather than trying to melt the chocolate all at once. This will cause the chocolate to seize and it will be harder to smooth out. The process above only takes about 3-4 cycles in my microwave and it's so worth it! Silky smooth chocolate every time :)
Fill
- Start by filling a 12 cup mini muffin tray half way up with melted chocolate. Note: I use a silicone mini muffin mold and it makes this process so easy! Reusable muffin liners or paper liners work too, but this pan is so convenient so I highly recommend it!
- Add about 1/4 tsp of raspberry jam into the center of each cup, and top with about 1/2 tsp of peanut butter. I find this is easiest to do with two teaspoons to situate the filling into the center of the choclate.
- Cover with additional chocolate to fill each cup and sprinkle sparingly with flakey sea salt on top (if using) Then freeze for 10-15 or until set. Serve when firm and enjoy!
Notes
Lots of notes!
- I like to make sure that I always use refined coconut oil when making chocolate candy at home because it hardens the chocolate so that it has a nice, creamy texture and a snap to it the way that tempered chocolate does (but without having to do all of the work of tempering) It's definitely worth it!
- More is not more in this recipe, so resist the urge to overfill the cups with peanut butter and jelly. If you do, it will leak out of the sides making the cups look more like chocolate sandwiches. Which is not a bad thing, but it's not ideal. I'm not sure why, but when the cups are overfilled, they're strangely hard to eat.
- I recommend using raspberry jam for this because the bright, tart raspberry flavor cuts the richness of the chocolate and compliments the peanut butter so beautifully, but any jam you like will work for this recipe. And if you want, you can add a fresh raspberry to the center instead! It's kind of like having an epic chocolate covered strawberry and it's so delicious! Eat within 2-3 days if using fresh fruit.
- Leftovers can be stored in an airtight container in the fridge but I prefer the freezer. Cold chocolate is so delicious (in my opinion) because it's crunchy and creamy at the same time. Try it if you haven't already 😊
- You may have more melted chocolate than you need for this recipe depending on the size of your mini muffin pan. If you have extra, you can drizzle it on top in a zig zag design for a fun textural element or save it for ice cream sundaes later in the week.
- Salted peanut butter makes a surprisingly big difference in this recipe! Highly recommend choosing a natural version with just roasted peanuts and salt listed in the ingredients.